1. Introduction
1.1. Lab Design
I have some cool experience deploying and configuring a Proxmox cluster with High Availability and fully redundant Ceph in production. I thought it’d be cool to share my insights. Since I have been meaning to redeploy my lab on my laptop to test some things, I thought this is a good time. To start, this post will be about setting up the lab environment and install one Proxmox instance. I’m going to write a few other tutorials as I go. You are free to use the content here as you see fit. I would appreciate being credited, but that’s not a requirement.
This a drawing of a production-ready virtualization cluster I designed. Please note that this design works with whatever you prefer: Proxmox, XCP-ng, VMware, Linux. I’m using Proxmox because it’s very approachable and free.
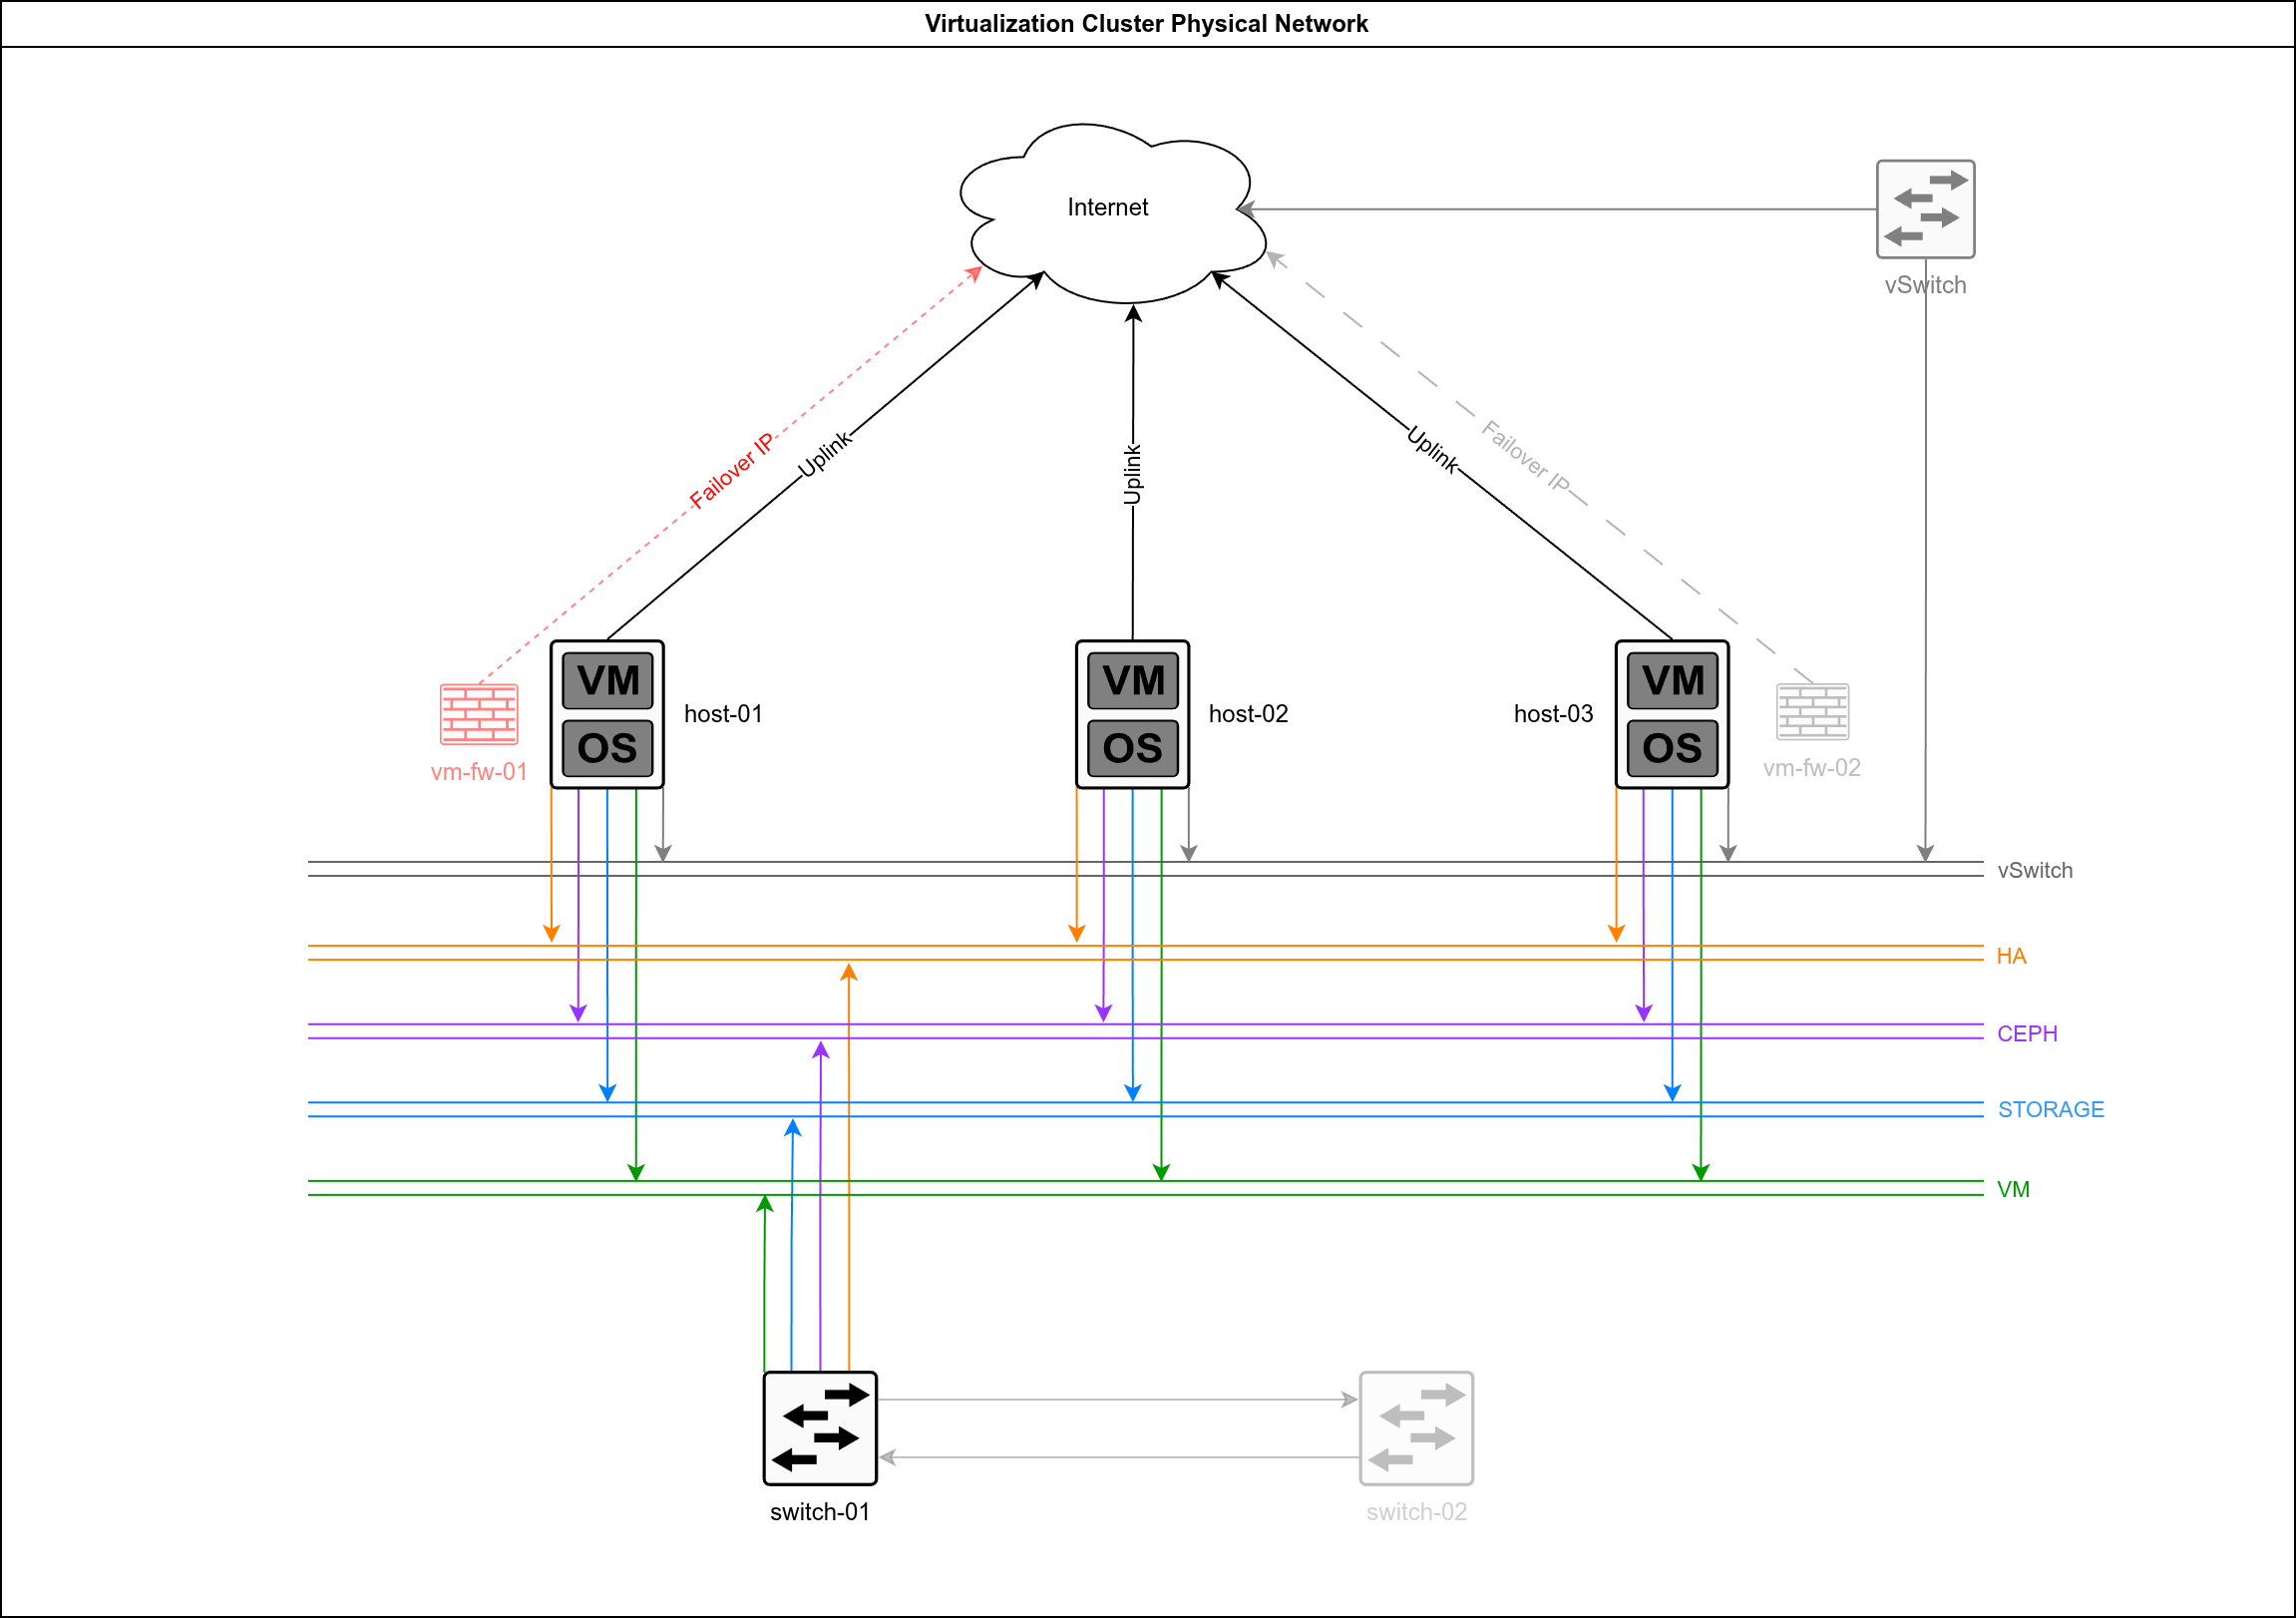
It ticks all the boxes you’d need for a production environment:
- High Availability: 3 virtualization nodes capable of Corosync or whatever else you virtualization platform uses. You will notice that I deployed 2 virtual firewalls. With pfSense or opnsense you can also have the firewalls doing HA.
- Redundancy: The 3 virtualization nodes can have fully redundant Ceph. If you have enough NICs on the hosts and the switches, you can also have redundant network. The Hetzner vSwitch also offers a flexible solution if you prefer to approach this with just one firewall VM on HA: the IP will follow it seamlessly if it’s moved to a different virtualization node.
- Network segmentation: Separate physical networks for different purposes. Good for security, great for performance.
A lot of Virtualization labs I see floating around in tutorials are built using a bunch of real hardware. While that’s undeniably cool and wholesome, we not always have the luxury of getting a bunch of extra computers. To be honest, nowadays I think it’s kind of wasteful in terms of energy, and also in terms of having idle PCs just for this if you end up powering them off. I think that Linux virtualization is mature enough that you can do really cool stuff with just one computer. In this series I will teach you to do precisely that.
1.2. Requirements
I’m not gonna lie: you need somewhat robust hardware for this. At this point if you’re not thinking about having a serious home lab to experiment with containers and virtualization, you might be in the wrong field. Serious. This is supposed to be enjoyable.
I’m running a laptop with:
- Ryzen 9 7940HS (8c/16t).
- 96GB DDR5 RAM (it’s crazy expensive to acquire RAM right now).
- 2TB WD SN850x NVMe (on top of my boot drive).
You could probably get away with:
- 6c/12t CPU (must be Intel VT-d or AMD-V). Check:
lscpu | grep Virtualization. - 64GB RAM. You will necessarily need to tune Ceph heavily. Don’t expect to fully test HA effectively (though I might be wrong).
- 1TB NVMe. You need an NVMe drive, or performance will suffer too much.
Alternatively, you could have 3 used mini-PCs. Some old SFF (small form-factor) or NUC-style could work. In this case:
- 4c: Having hyper-threading is nice-to-have, but I think you can live without it.
- 16GB RAM. More than 16GB RAM is actually better for what we are trying to achieve. Optimally 20GB+ per node.
- 250-300GB NVMe per node. Regular SSDs will work too.
- Network: 1x VLAN-capable managed switch. You need to be able to segregate the networks. 3 4-8 ports dumb switches will also work. Because you probably won’t have multiple NICs, you will need to improvise with USB NICs. Any 1Gbps models will do. Optimally 5 per node, but you can simplify.
The physical hardware alternative is, in my opinion, clunky and can end up costing more than having a decent laptop or desktop, because the networking will require a lot of physical hardware. If you go that route, I leave it up to you.
Our virtual lab is being set up on an Arch Linux host. I love Arch, you can do anything with it. It’s Linux the way it’s supposed to be. I don’t go crazy with ricing, I think it burns too much time and I already have to babysit GitHub projects and my work environment. Still, the AUR and Distrobox make many things much easier. You could adapt this guide easily to run on Debian-based or RHEL-based, I bet your favorite AI tool will have no problems to translate the steps into your favorite distro.
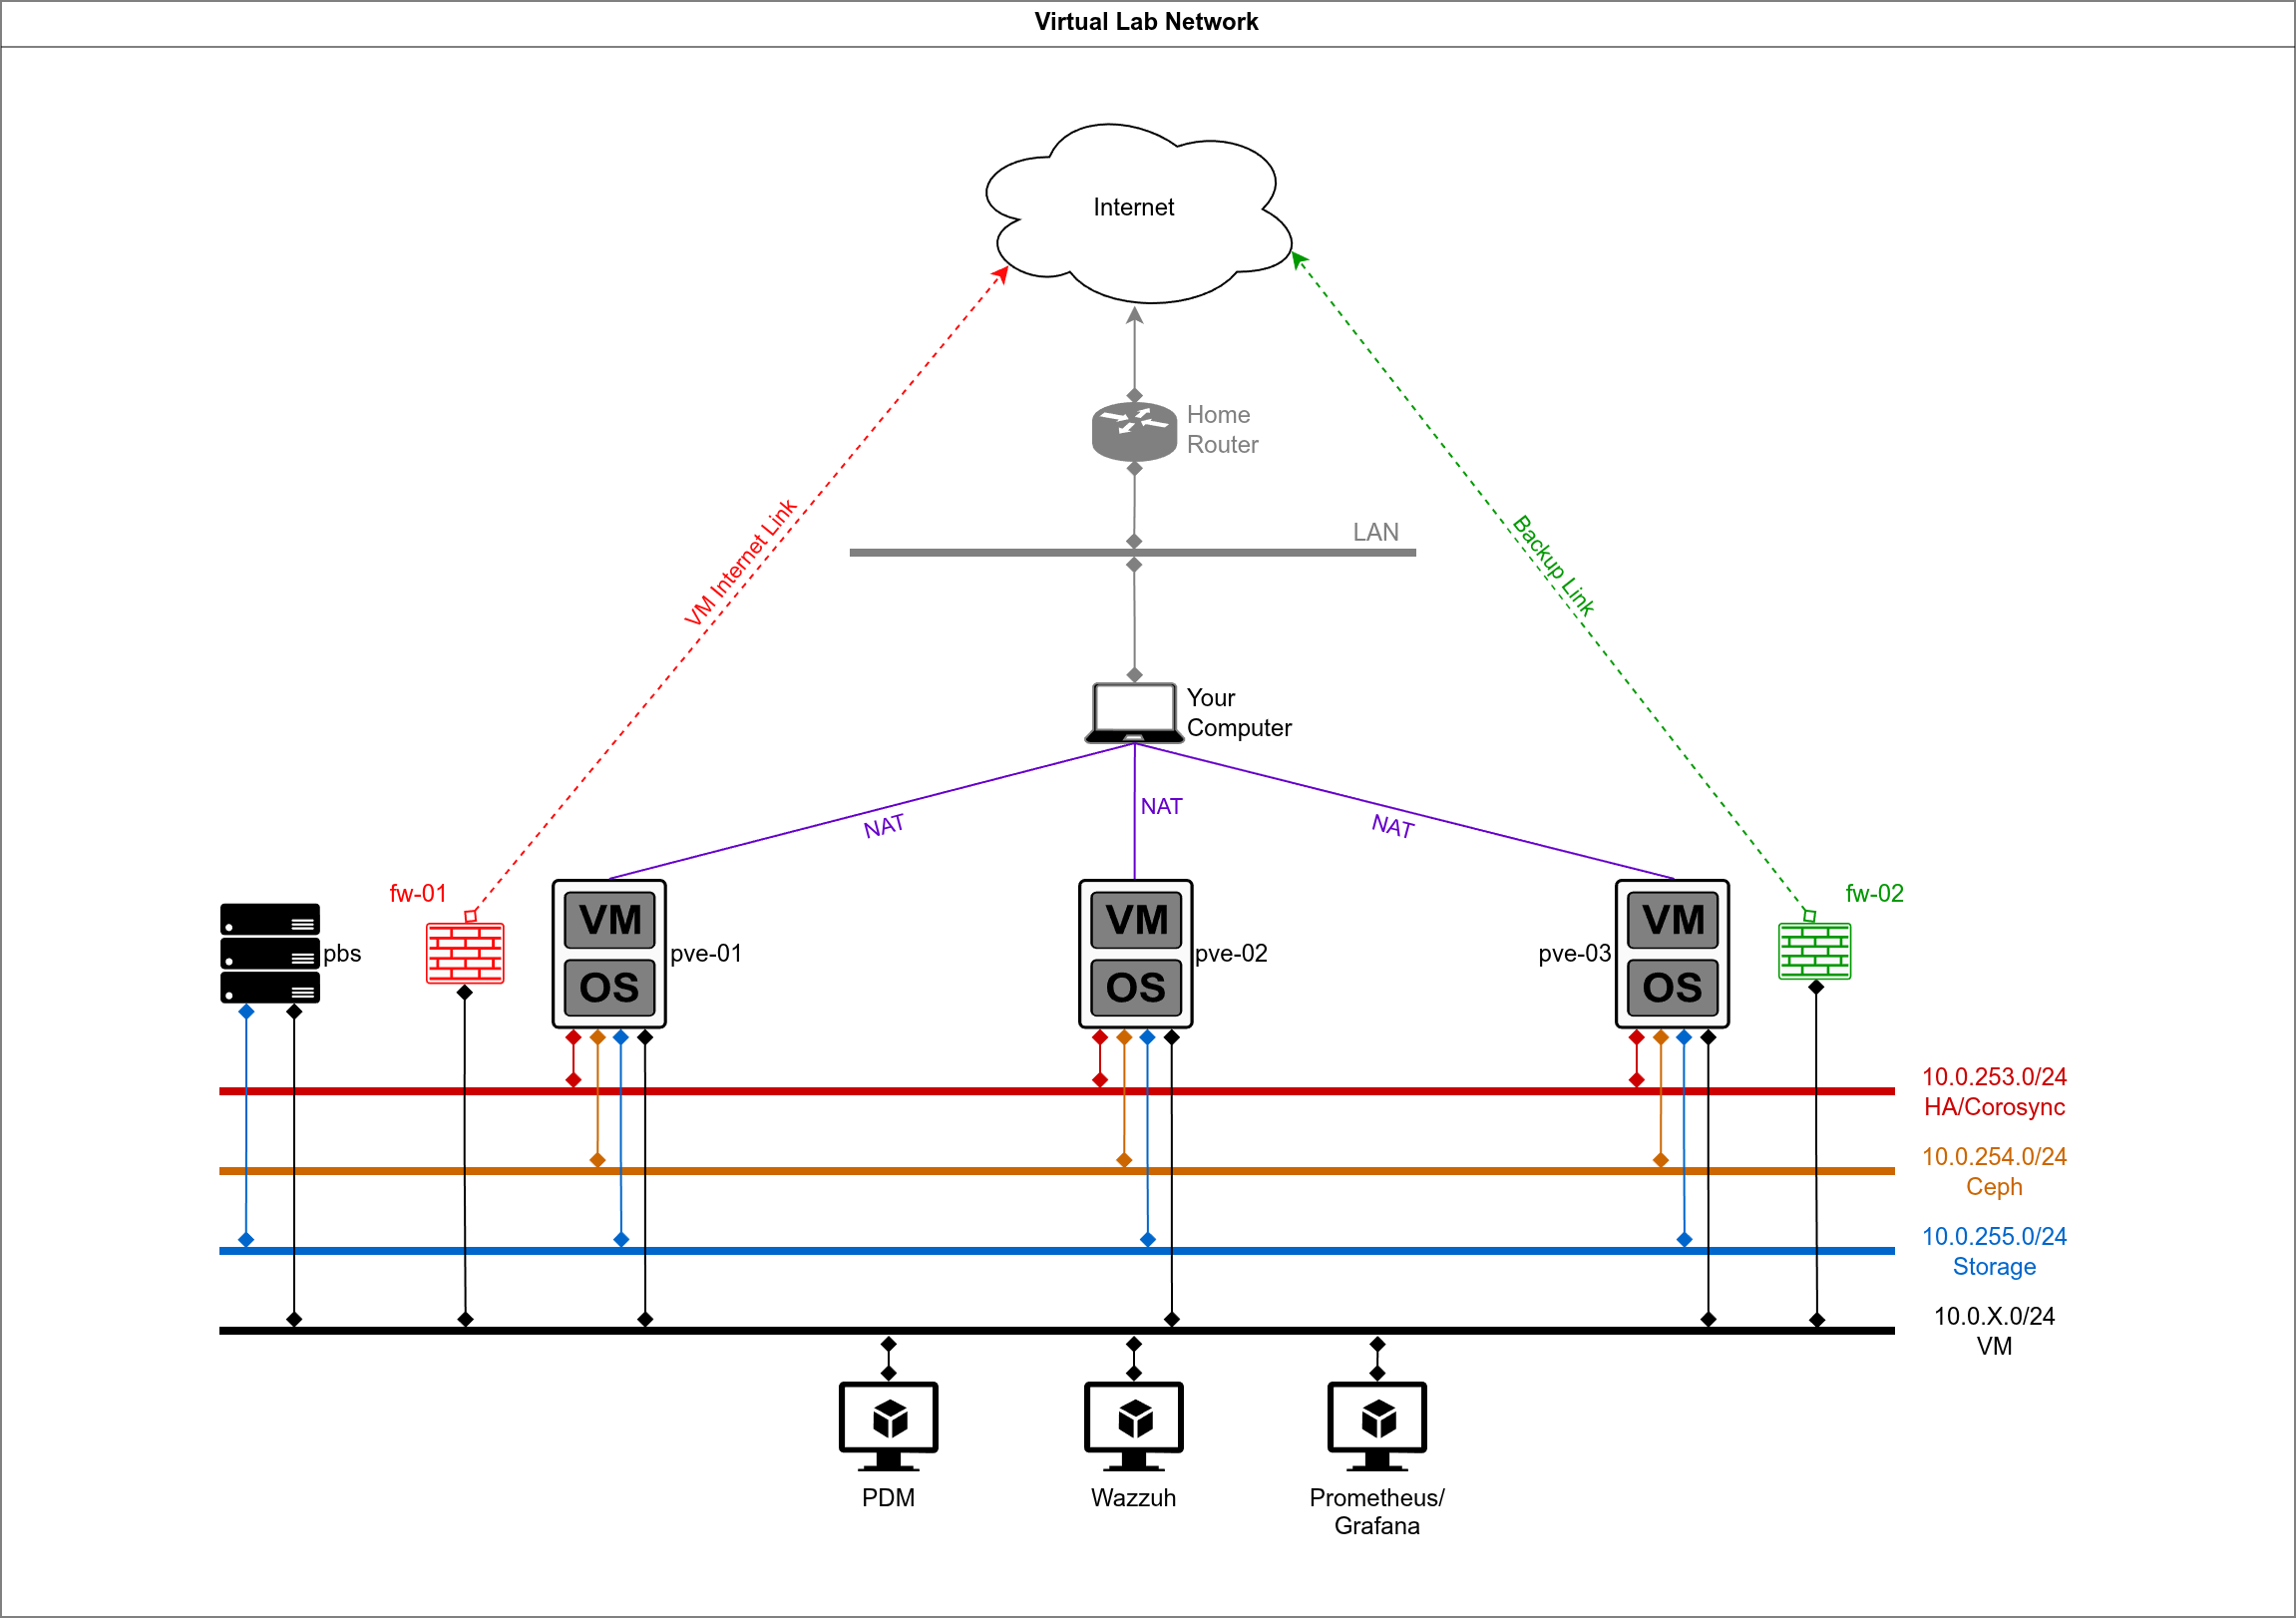
This is the lab we will be building, I think this is remarkably close to a production system:
2. Setting Up the Environment
2.1. Setting up /var/lib/libvirt
If you go with the defaults, you could skip to #2. I, however, have a matter of personal preference: I like to do things from my ~/ directory, and on my machine I have a 2TB NVMe specifically allocated for /home. I thought I’d go with symlinks, but I had some issues with this a while ago. I did some research and found out that bind mounts are the best approach: you get the same filesystem location exposed at two paths. Avoids all the potential weirdness from using symlinks for this. This is where all of your virtualization files, which consume a lot of disk space, will reside.
# Create ~/libvirt
mkdir /home/${USER}/libvirt

# Create /var/lib/libvirt
sudo mkdir /var/lib/libvirt

# Add the entry to /etc/fstab
echo "/home/${USER}/libvirt /var/lib/libvirt none bind 0 0" | sudo tee -a /etc/fstab

# Reload so that you can apply
systemctl daemon-reload

# Mount it
mount -a

# Test it
touch ~/libvirt/testfile
ls /var/lib/libvirt/testfile
My /home is encrypted on a separate volume as /. As long as the new mount is at the bottom of /etc/fstab, which it should, it should be handled automatically if you followed my steps.
For this to work well, we need to manage directory permissions with ACLs, so that all the necessary users can operate in the directory:
# Ensure ~/ is traversable
chmod 755 ~/

# Set base permissions on libvirt dir
chmod 775 ~/libvirt

# Install the ACL package
sudo pacman -S acl

# Apply rwx permissions for your user to all existing files/dirs recursively
sudo setfacl -R -m u:$(whoami):rwx,m::rwx ~/libvirt/

# Set default ACL - new files/dirs created inside inherit these permission
sudo setfacl -R -d -m u:$(whoami):rwx,m::rwx ~/libvirt/
There will be a bunch of permission steps later if you are doing this. In this guide I will be referring to the default /var/lib/libvirt directory so that it’s portable if you haven’t made the same choices.
2.2. Configuring the Virtualization Suite
2.2.1. Setting up the System
We will now install the necessary virtualization packages:
sudo pacman -S libvirt qemu-full virt-manager virt-viewer dnsmasq ebtables dmidecode
Once that’s done, add your user to the libvirt group:
sudo usermod -aG libvirt $(whoami)
Then enable and start the libvirtd service:
sudo systemctl enable --now libvirtd
And check if no errors with systemctl status libvirtd, it should show something like this:
● libvirtd.service - libvirt legacy monolithic daemon
     Loaded: loaded (/usr/lib/systemd/system/libvirtd.service; enabled; preset: disabled)
     Active: active (running) since Sun 2026-01-18 17:09:03 GMT; 5s ago
 Invocation: 43007c7f51c445a485af01f5f3ba08f5
TriggeredBy: ● libvirtd.socket
             ● libvirtd-admin.socket
             ● libvirtd-ro.socket
       Docs: man:libvirtd(8)
             https://libvirt.org/
   Main PID: 11650 (libvirtd)
      Tasks: 21 (limit: 32768)
     Memory: 8.6M (peak: 10M)
        CPU: 695ms
     CGroup: /system.slice/libvirtd.service
             └─11650 /usr/bin/libvirtd --timeout 120

Jan 18 17:09:03 laptop systemd[1]: Starting libvirt legacy monolithic daemon...
Jan 18 17:09:03 laptop systemd[1]: Started libvirt legacy monolithic daemon.
Also check that the daemon is responding to commands with virsh list --all, it should return an empty table:
$ virsh list --all
# Expected output:
 Id   Name   State
--------------------
Now you need to configure your user to connect to qemu:///system where the real networking happens, rather than qemu:///session:
Add this line to your .bashrc file and reload your shell:
echo 'export LIBVIRT_DEFAULT_URI="qemu:///system"' >> ~/.bashrc
source ~/.bashrc
Test with virsh uri, if it shows qemu:///system, you’re good to go:
$ virsh uri
# Expected output:
qemu:///system
2.2.2. Setting up the Project Directory
We will be building a directory structure where we will be storing our files:
mkdir -p ~/Projects/virtual-proxmox-lab/{diagrams,guests/{pve-01,pve-02,pve-03,pbs},host/{configs,scripts}}
We might be changing things in this directory later on. This is how it should look like right now:
$ tree -L 2 virtual-proxmox-lab/
# Expected output:
virtual-proxmox-lab/
├── diagrams
├── guests
│   ├── pbs
│   ├── pve-01
│   ├── pve-02
│   └── pve-03
├── host
│   ├── configs
│   └── scripts
When I refer to the “project directory” or to virtual-proxmox-lab this is where I expect you to go, regardless of where you created it in your system.
2.3. Setting up the Networks
2.3.1. Redefine default
First we will set up the default NAT network with the settings we desire. It’s likely already set up, so run:
virsh net-stop default
virsh net-destroy default
virsh net-undefine default
Then go to your directory ~/Projects/virtual-proxmox-lab/host/configs. This is where we will leave template files. Once there vim default.xml and add this:
<network>
  <name>default</name>
  <forward mode="nat"/>
  <bridge name="virbr0"/>
  <ip address="192.168.122.254" netmask="255.255.255.0">
    <dhcp>
      <range start="192.168.122.1" end="192.168.122.253"/>
    </dhcp>
  </ip>
</network>
Then run the following commands to activate the network:
virsh net-define default.xml
virsh net-start default
virsh net-autostart default
virsh net-list --all
We are going with a class C 192.168.122.0/24 subnet because it’s already the default, and because it’s very distinct from class A, which is what we will be using for the other subnets. Check that the interface virbr0 exists:
ip a | grep virbr0
6: virbr0: <NO-CARRIER,BROADCAST,MULTICAST,UP> mtu 1500 qdisc htb state DOWN group default qlen 1000
    inet 192.168.122.254/24 brd 192.168.122.255 scope global virbr0
You will notice that the host, which will also be the gateway to the Proxmox VMs, is using IP ending in .254. That’s a personal preference, as I like when we have vm-pve1, vm-pve2 and vm-pve3 to have their IPs ending in .1, .2 and .3 respectively. Keeps everything easy to remember and tidy.
2.3.2. Define the Other Subnets
We will now configure the bridges which will simulate a virtual switch with separate VLANs. This is how we will configure the subnets:
- HA/Corosync: will be on subnet
10.0.253.0/24and bridgeha-br. - Ceph: will be on subnet
10.0.254.0/24and bridgeceph-br. - Storage: will be on subnet
10.0.255.0/24and bridgest-br. - VMs: These are the VMs which will run inside the virtual Proxmox nodes, they will be on subnet
10.0.X.0/24(whereXis something which doesn’t conflict with your home network, maybe1or10) and bridgevm-br.
The logic for these addresses is that we would “backbone” infrastructure to be distinct from where our VMs are. I also choose IPs which will probably not collide with whatever configuration you have at home. I also think that is a good practice for production environments, to choose private IPs which will likely not conflict with home routers. In the case of the bridge vm-br: in a production environment you would probably have multiple VLANs and subnets there rather than just one, potentially servicing thousands of devices.
Now you can copy the .xml bellow into your ~/Projects/virtual-proxmox-lab/host/configs directory, using vim or whatever you prefer to create each file:
file: ha-br.xml
<network>
  <name>ha-br</name>
  <bridge name="ha-br"/>
  <ip address="10.0.253.254" netmask="255.255.255.0"/>
</network>
file: ceph-br.xml
<network>
  <name>ceph-br</name>
  <bridge name="ceph-br"/>
  <ip address="10.0.254.254" netmask="255.255.255.0"/>
</network>
file: st-br.xml
<network>
  <name>st-br</name>
  <bridge name="st-br"/>
  <ip address="10.0.255.254" netmask="255.255.255.0"/>
</network>
file: vm-br.xml
<network>
  <name>vm-br</name>
  <bridge name="vm-br"/>
</network>
After you’re done, time to enable all of them. Let’s use a for loop to save us some time:
for net in ha-br ceph-br st-br vm-br; do
  virsh net-define ${net}.xml
  virsh net-start ${net}
  virsh net-autostart ${net}
done
Now when you check with virsh net-list --all this is what you should see:
❯ virsh net-list --all
 Name      State    Autostart   Persistent
--------------------------------------------
 ceph-br   active   yes         yes
 default   active   yes         yes
 ha-br     active   yes         yes
 st-br     active   yes         yes
 vm-br     active   yes         yes
And another quick check on your actual network interfaces:
for net in ha-br ceph-br st-br vm-br; do
  ip a | grep ${net}
done
Which should give you something like this:
6: virbr0: <NO-CARRIER,BROADCAST,MULTICAST,UP> mtu 1500 qdisc htb state DOWN group default qlen 1000
    inet 192.168.122.254/24 brd 192.168.122.255 scope global virbr0
7: ha-br: <NO-CARRIER,BROADCAST,MULTICAST,UP> mtu 1500 qdisc htb state DOWN group default qlen 1000
    inet 10.0.253.254/24 brd 10.0.253.255 scope global ha-br
8: ceph-br: <NO-CARRIER,BROADCAST,MULTICAST,UP> mtu 1500 qdisc htb state DOWN group default qlen 1000
    inet 10.0.254.254/24 brd 10.0.254.255 scope global ceph-br
9: st-br: <NO-CARRIER,BROADCAST,MULTICAST,UP> mtu 1500 qdisc htb state DOWN group default qlen 1000
    inet 10.0.255.254/24 brd 10.0.255.255 scope global st-br
10: vm-br: <NO-CARRIER,BROADCAST,MULTICAST,UP> mtu 1500 qdisc htb state DOWN group default qlen 1000
3. Wrapping up
Install tree with sudo pacman -S tree. Then run tree -L 2 from the project’s folder and you should be looking at something like this:
$ tree -L 2
.
├── diagrams
├── guests
│   ├── pbs
│   ├── pve-01
│   ├── pve-02
│   └── pve-03
├── host
│   ├── configs
│   │   ├── ceph-br.xml
│   │   ├── default.xml
│   │   ├── ha-br.xml
│   │   ├── st-br.xml
│   │   └── vm-br.xml
│   └── scripts
This is it for network creation. I hate to end it in a cliffhanger, but such is life. Next week we will be configuring storage and creating the Proxmox VMs. Maybe we will will also be installing one instance. If you have some experience you could already go ahead and experiment with what we’ve built so far. I hope to see you again soon!
God bless you.